Generally speaking, the LoRa development board will provide a boot option, that is, from which region to start. Many use the jumper cap to select boot, which also leads to the need to modify the jumper cap when the LoRa development board is upgraded.
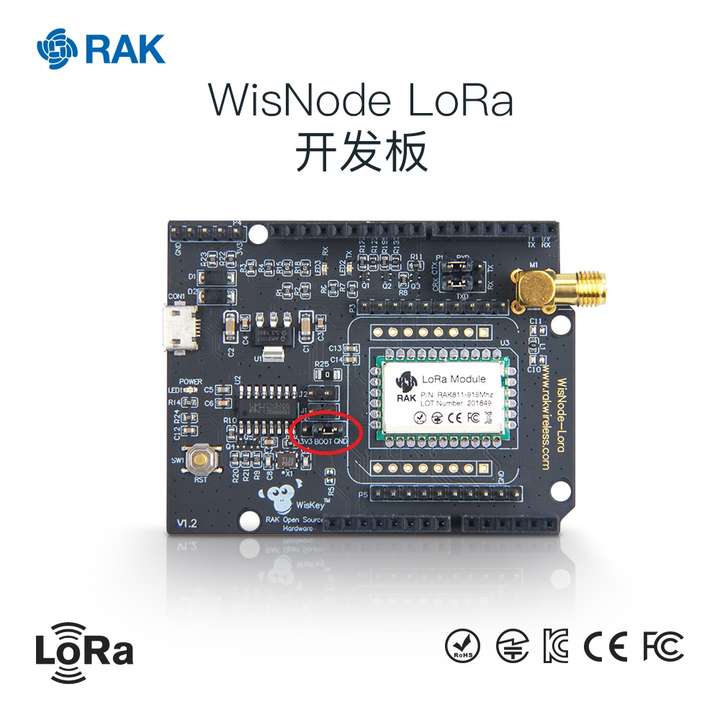
An example of the position of the jumper cap of the LoRa development board can be seen in Figure 1:

Figure 1 is WisNode-lora of Ricoh Huilian, which includes RAK811 module. The red circle in Figure 1 is where the jumper cap is placed. As can be seen from Figure 1, this board is a jumper cap that controls the height of boot0, boot1 is connected to 0, and cannot be changed, so this board can have two startup methods, that is, the corresponding two when boot0 = 1 or 0 Start mode.
In the following, we will explain the relationship between the selection of the startup method and the jumper cap during the startup of the LoRa node.
The so-called start-up generally refers to the fourth rising edge of SYSCLK and the value of the BOOT pin will be latched when we restart the chip after a good program is downloaded. The user can set the state of the BOOT1 and BOOT0 pins by setting jumper caps to choose the startup mode after reset. It should be noted that not all boards of LoRa nodes can adjust the values of BOOT0 and BOOT1, and some may only set the value of one of them. For details, please refer to the product manual.
The relationship between the startup mode of the LoRa development board and BOOT1 and BOOT0 is shown in Table 1.

The explanation of the various startup modes in Table 1 is as follows:
(1) The main flash memory (Main Flash memory) is selected as the boot area
The main flash memory is the built-in Flash of STM32. Generally, when we use JTAG or SWD mode to download the program, it is downloaded to this, and the program is also started directly from here after restart.
(2) System memory (System memory) is selected as the startup area
Starting from the system memory, the program function started in this mode is set by the manufacturer. Generally speaking, this startup method is used less. The system memory is a specific area inside the chip. When the STM32 is shipped from the factory, ST presets a BootLoader in this area, which is what we often call the ISP program. This is a ROM that cannot be modified after shipment. Generally speaking, when we choose this startup mode, we are downloading the program from the serial port, because in the BootLoader provided by the manufacturer, the firmware of the serial port downloading program is provided, and the program can be downloaded to the Flash of the system through this BootLoader. However, this download method requires the following steps:
Step1: Set BOOT0 to 1, BOOT1 to 0, and then press the reset button, so that BootLoader can be started from the system memory
Step2: Finally, with the help of BootLoader, download the program to the Flash through the serial port
Step3: After the program download is completed, it is necessary to set BOOT0 to GND and manually reset it, so that STM32 can be started from Flash. It can be seen that downloading the program through the serial port is more troublesome.
(3) The built-in SRAM (Embedded Memory) is selected as the boot area
Built-in SRAM, since it is SRAM, naturally there is no program storage capability, this mode is generally used for program debugging. If I only modify a small place in the code, and then I need to re-erase the entire Flash, which is more time-consuming, you can consider starting the code from this mode (that is, in the STM32 memory) for quick program debugging, etc. After the program debugging is completed, download the program to SRAM.
It can be seen that the function of the jumper cap is to adjust the values of BOOT0 and BOOT1, so as to select different areas as the startup area of the LoRa development board according to different actual scenarios.


1 Comments
Vterflahauru Andrea Pollock link
ReplyDeletesweetamladpe