This setup does not require a monitor or any input devices. The Raspberry Pi can be configured screenless; that is why it is called a Headless setup. By default, the Raspberry Pi OS installs the SSH protocol disabled. You can turn it on without using a monitor and keyboard.
Requirements
Hardware
- Raspberry Pi 3B+/4
- Power adapter 5V (at least 2.5A for Raspberry Pi 3B+ and 3A for Raspberry Pi 4)
- SD card with preloaded Raspbian OS for Raspberry Pi 64GB
- SD card reader
- A PC/ Laptop
Software
- SSH terminal console (e.g. PuTTY (opens new window))
- Setup the SD card
Assuming you have flashed the latest Raspberry Pi OS, insert the SD card into your PC/laptop. Open the root of the directory of the card.
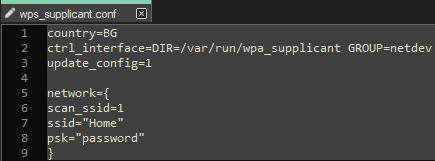
In here, create a text file called wpa_supplicant.conf. The wpa_supplicant includes the needed information for the Wi-Fi interface of the Raspberry Pi to connect to a Wireless network.
Change YOUR_COUNTRY with the abbreviation of your country. you can find your country's two-letter code, according to ISO standards.
Also, change YOUR_WIFI_SSID with the SSID of your network and YOUR_WIFI_PASSWORD with the password of that network
Save and exit the text file.
If you want to use the Ethernet interface, plug the Raspberry Pi directly into your wired network. The DHCP server of the router will assign an IP to the Raspberry Pi.
Apart from the wpa_supplicant.conf file, also create an empty file (with no extension) named ssh. This will enable the SSH interface on the Raspberry Pi
Now you can eject the SD card and insert it into the Raspberry Pi. Once Pi is booted, it will connect to the WI-FI network. The DHCP server will assign an IP and you can access the Pi at that address.
To find the assigned IP, you can either go to your router’s web UI in the DHCP clients menu or use a program (in this example Advanced IP Scanner) to scan the network.
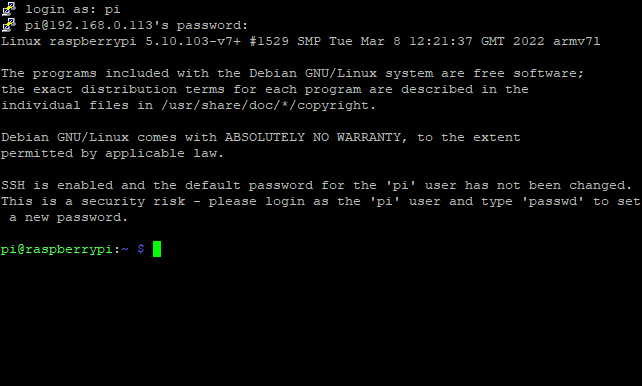
You can access the Raspberry Pi on that IP using a terminal console (in this example: PuTTY)
Login using the default credentials
- Login: pi
- Password: raspberry
You can now head to Configuring the Raspberry Pi's Interfaces
Check out Raspberry Pi General Setup: In the general Raspberry Pi setup, you will learn how to setup the Pi with the help of a monitor and a keyboard.


0 Comments